ModSecurity is an open source and great module to securing sites around the world.
ModSecurity protects against Layer 7 attacks.
It will prevent SQL injection (SQLi), local file inclusion (LFI), and cross‑site scripting (XSS).
There are repository from getpagespeed.com, however now they activated subscriptions.
You have a choice use their subscription for 10 USD a month per server or compile it your self.
This article write using official Nginx repository, latest stable version is 1.16.1.
Also Read: How to install and configure Nginx ModSecurity on CentOS 9 Stream
How to install ModSecurity
Below is how to compile and install Nginx ModSecurity on CentOS 7
# yum groupinstall 'Development Tools' -y
# yum install gcc-c++ flex bison yajl yajl-devel curl-devel curl GeoIP-devel doxygen zlib-devel
# yum install lmdb lmdb-devel libxml2 libxml2-devel ssdeep ssdeep-devel lua lua-devel pcre-devel
# cd /usr/src/
# git clone --depth 1 -b v3/master --single-branch https://github.com/SpiderLabs/ModSecurity
# cd ModSecurity/
# git submodule init
# git submodule update
# ./build.sh
# ./configure
# make
# make install
If you see error message fatal: No names found, cannot describe anything.”, you can ignore it.
ModSecurity will be installed on /usr/local/modsecurity
Compile and Install Nginx ModSecurity
Now you need to clone ModSecurity-nginx and compile as dynamic module.
# cd /usr/src
# git clone --depth 1 https://github.com/SpiderLabs/ModSecurity-nginx.git
First, check your Nginx version with command:
# nginx -VThe out put will be like this:
# nginx -V
nginx version: nginx/1.16.1
built by gcc 4.8.5 20150623 (Red Hat 4.8.5-36) (GCC)
built with OpenSSL 1.0.2k-fips  26 Jan 2017
TLS SNI support enabled
configure arguments: --prefix=/etc/nginx --sbin-path=/usr/sbin/nginx --modules-path=/usr/lib64/nginx/modules --conf-path=/etc/nginx/nginx.conf --error-log-path=/var/log/nginx/error.log --http-log-path=/var/log/nginx/access.log --pid-path=/var/run/nginx.pid --lock-path=/var/run/nginx.lock --http-client-body-temp-path=/var/cache/nginx/client_temp --http-proxy-temp-path=/var/cache/nginx/proxy_temp --http-fastcgi-temp-path=/var/cache/nginx/fastcgi_temp --http-uwsgi-temp-path=/var/cache/nginx/uwsgi_temp --http-scgi-temp-path=/var/cache/nginx/scgi_temp --user=nginx --group=nginx --with-compat --with-file-aio --with-threads --with-http_addition_module --with-http_auth_request_module --with-http_dav_module --with-http_flv_module --with-http_gunzip_module --with-http_gzip_static_module --with-http_mp4_module --with-http_random_index_module --with-http_realip_module --with-http_secure_link_module --with-http_slice_module --with-http_ssl_module --with-http_stub_status_module --with-http_sub_module --with-http_v2_module --with-mail --with-mail_ssl_module --with-stream --with-stream_realip_module --with-stream_ssl_module --with-stream_ssl_preread_module --with-cc-opt='-O2 -g -pipe -Wall -Wp,-D_FORTIFY_SOURCE=2 -fexceptions -fstack-protector-strong --param=ssp-buffer-size=4 -grecord-gcc-switches -m64 -mtune=generic -fPIC' --with-ld-opt='-Wl,-z,relro -Wl,-z,now -pie'
Now you need to download Nginx source, depend on your Nginx version.
In this example is Nginx 1.16.1
# cd /usr/src
# wget http://nginx.org/download/nginx-1.16.1.tar.gz
# tar zxvf nginx-1.16.1.tar.gz
# cd nginx-1.16.1
# ./configure --with-compat --add-dynamic-module=../ModSecurity-nginx
# make modules
# cp objs/ngx_http_modsecurity_module.so /etc/nginx/modules
# cp /usr/src/ModSecurity/modsecurity.conf-recommended /etc/nginx/modsecurity.conf
# cp /usr/src/ModSecurity/unicode.mapping /etc/nginx/unicode.mapping
Enable SecRuleEngine, edit /etc/nginx/modsecurity.conf and change
SecRuleEngine DetectionOnly
to
SecRuleEngine On
Compiled Nginx ModSecurity located in objs.
Configure Nginx to use ModSecurity module
To load ModSecurity on Nginx, edit /etc/nginx/nginx.conf and add this code in top of configuration.
error_log  /var/log/nginx/error.log warn;
pid        /var/run/nginx.pid;

load_module modules/ngx_http_modsecurity_module.so;
And on your server block add this code:
server {
	.......
	.......
	modsecurity on;
	modsecurity_rules_file /etc/nginx/modsec_includes.conf;
	.......
	.......
}
Get OWASP ModSecurity Core Rule Set (CRS) from https://coreruleset.org or https://www.owasp.org/index.php/Category:OWASP_ModSecurity_Core_Rule_Set_Project
# cd /etc/nginx
# wget https://github.com/SpiderLabs/owasp-modsecurity-crs/archive/v3.2.0.zip
# unzip v3.2.0.zip
# mv owasp-modsecurity-crs-3.2.0 owasp-modsecurity-crs
# cp owasp-modsecurity-crs/crs-setup.conf.example owasp-modsecurity-crs/crs-setup.conf
Create /etc/nginx/modsec_includes.conf and add code below
include modsecurity.conf
include /etc/nginx/owasp-modsecurity-crs/crs-setup.conf
include /etc/nginx/owasp-modsecurity-crs/rules/*.conf

# Additional custom rules here
SecRule REQUEST_URI "@beginsWith /rss/" "phase:1,t:none,pass,id:'26091902',nolog,ctl:ruleRemoveById=200002"
Check your Nginx configuration with
# nginx -t
nginx: the configuration file /etc/nginx/nginx.conf syntax is ok
nginx: configuration file /etc/nginx/nginx.conf test is successful
If no problem, restart nginx
# systemctl restart nginxTesting Nginx ModSecurity
Check on your rules for blacklist user agent, for Comodo rules is bl_agents
# curl -I -H "User-Agent: floodgate" https://serverdiary.comExample response
# curl -I -H "User-Agent: floodgate" https://serverdiary.com
HTTP/1.1 403 Forbidden
Server: nginx
Date: Sat, 26 Oct 2019 18:07:01 GMT
Content-Type: text/html
Content-Length: 146
Connection: keep-alive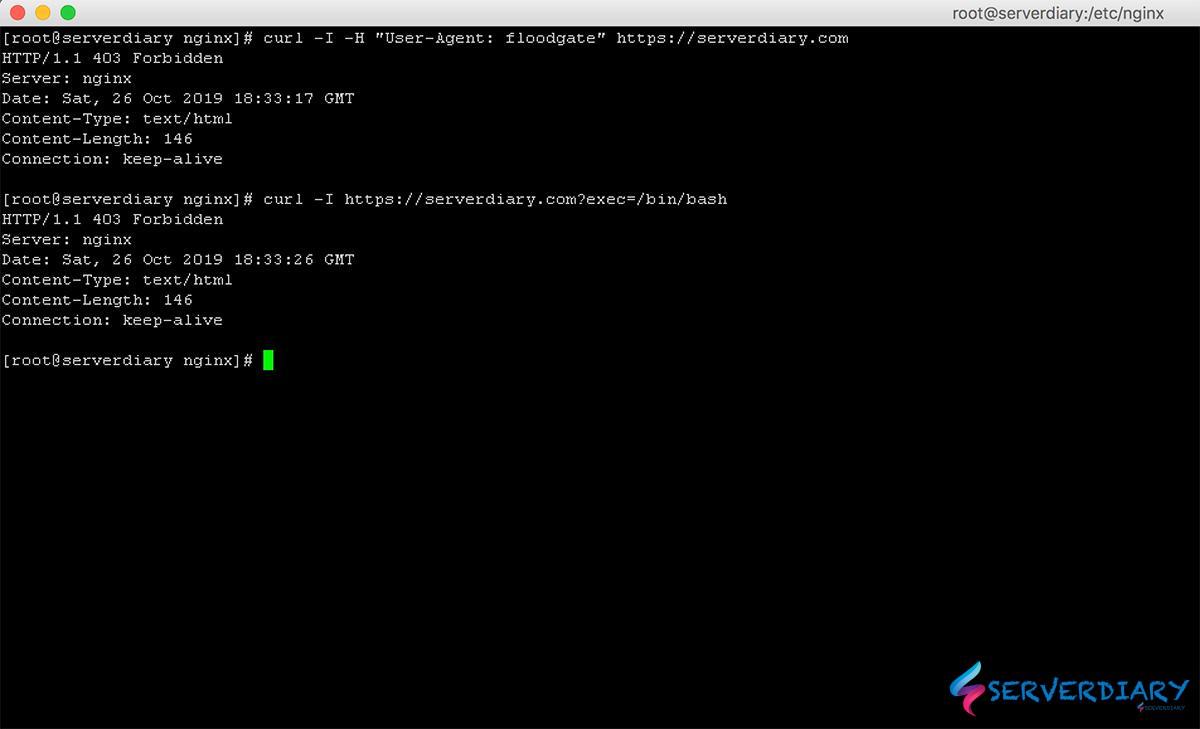
If the respons is forbidden, your Nginx ModSecurity is working.
Don’t forget to check /var/log/modsec/audit.log there is many rules is false positive.
Example, OWASP ModSecurity Core Rule Set rules will block your WordPress admin post.


Hey, buddy! Excellent tutorial! I am looking to install ModSec for my NGINX as per this tutorial (same OS and Packages version) however after configuring everything when I run the NGINX file test I get the following error message:
nginx: [emerg] module “/usr/share/nginx/modules/ngx_http_modsecurity_module.so” is not binary compatible in /etc/nginx/nginx.conf:10
nginx: configuration file /etc/nginx/nginx.conf test failed
Do you have any idea as to why this is happening? Do I need a different modsec installation package?
Thanks a lot!
Andre.
It’s like ngx_http_modsecurity_module.so not in right place.
Also check module folder location in nginx configuration.
Check on this following command:
cp objs/ngx_http_modsecurity_module.so /etc/nginx/modules
You can check module location and nginx.conf on line 10.
Also check is module file with this command:
ls -lia/usr/share/nginx/modules/ngx_http_modsecurity_module.so
Check is Downloaded Nginx Source Version is correct and same as Nginx -V.
If you seek to install ModSecurity with NGINX, it means you want more security for your webserver.
But if you compile software on a Community Enterprise OS, you create a security risk.
Thus, installing ModSecurity by compiling it, makes absolutely no sense whatsoever.
It must be installed via packages only. By using packages, it is both secure and very easy to install or update.
There are commercial packages available either through NGINX Plus or cheaper by GetPagespeed:
https://www.getpagespeed.com/server-setup/nginx/install-modsecurity-nginx-module-on-centos-7
As per this post, you have to remove the –with-compat when you run the .configure for Nginx!
https://github.com/SpiderLabs/ModSecurity-nginx/issues/117
We will got error loading dynamic module if you remove –with-compat
“wget http://nginx.org/download/nginx-1.16.1.tar.gz” while running this command I am getting following error:
-2022-01-31 16:37:24– http://nginx.org/download/nginx-1.20.2.tar.gz
Resolving nginx.org (nginx.org)… 3.125.197.172, 52.58.199.22, 2a05:d014:edb:5704::6, …
Connecting to nginx.org (nginx.org)|3.125.197.172|:80… failed: Connection timed out.
Connecting to nginx.org (nginx.org)|52.58.199.22|:80… failed: Connection timed out.
Connecting to nginx.org (nginx.org)|2a05:d014:edb:5704::6|:80… failed: Network is unreachable.
Connecting to nginx.org (nginx.org)|2a05:d014:edb:5702::6|:80… failed: Network is unreachable.
You can curl http://nginx.org/download/nginx-1.20.2.tar.gz or manually download it and upload in /usr/src then extract it.